
Knowing how to take screenshots on any OS or device is crucial and might come handy time to time. In this post we are going to cover regular and more advanced methods to take screenshot in three widely used computer operating systems: Mac, Ubuntu and Window.
Macintosh
Ever since I started using Mac (Mac OS X Leopard - 10.5), the OS was offering an easy to use method of capturing screenshots using simple keyboard hot-keys. Although, despite its convenience, many of the users are not aware of such feature and for that reason they are using third party applications to take screenshots. By Default, macOS provides 4 hot-keys to take screenshots with different outcomes.
1. Save Entire Screen to File:
Pressing Command + Shift + 3 at the same time on your Mac keyboard would take an instant screenshot of your screen and save it as a PNG file on your desktop.
Note: If you have additional monitors connected to you Mac, it will store several files, one for each monitor
2.Save Selected Area to File:
If you are only interested in storing a part of the screen to a file, you can press Command + Shift + 4. Your mouse pointer will immediately turn into a crosshair and you can select a rectangular area that you are interested in taking screen shot from. Once you draw the rectangle, it will save it to a file on your desktop.
3. Save a Window or Menu to File
if you are targeting a single window or menu on your screen, option #2 does not give you the best result. The best option to do so is to hit Command + Shift + 4 + Space, you mouse pointer turns into a camera icon. Move your mouse to the desired menu or window and select it. Using this method gives you advantage of having a clean, isolated screenshot of your desired window. See images below comparing option #2 on left and #3 or right in taking picture from the same window.

Comparing option #2 (left) and #3 on taking screenshot from a single window.
In several occasions you might only need to use a screenshot in a message or want to use it in a document so it is not necessary to save the screenshot as a separate file. You can copy the screenshots to the clipboard by adding the Control key to the two combinations above
4. Copy Entire Screen to Clipboard: Press Command + Ctrl + Shift + 3 to store the entire screen in clipboard. But note that if you have more than one screen, it will only store your primary screen in the clipboard. If you are interested in other screens you can either use the save to file option (#1) or select area and copy to clipboard option (#4).
5. Copy Selected Area to Clipboard: Press Command + Ctrl + Shift + 4 and select the interested area. Then you can easily paste it to any document you are working on.
6. Copy Selected Window to Clipboard: Press Command + Ctrl + Shift + 4 + Space and select the desired window.
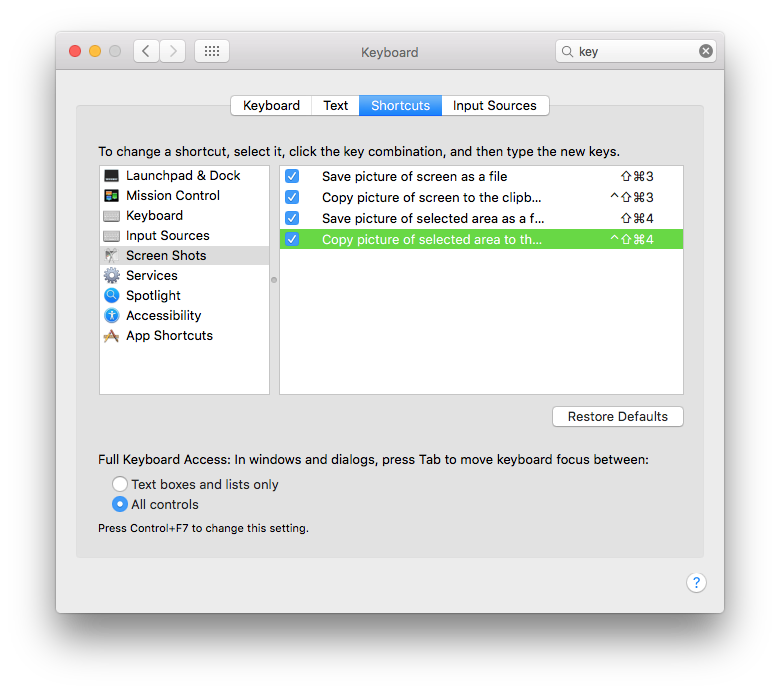
If you are not happy with the default hot-keys, you have the option to change them. Simply follow these instructions to do so:
- Run System Preferences: either by clicking Apple menu on top left corner of the screen or searching in spotlight.
- Select Keyboard
- Go to Shortcuts tab
- From the list on the left, select Screen Shot
- Choose the option you want to change
- Double click on the key combination to make it editable
- Now press your desired combination on the keyboard
You can also watch using these screen shot hot-keys in action in the video below:
The other option available on Mac is to use a build-in utility named "Grab". You can access Grab from Applications/Utilities (or by pressing Command + Shift + U in any finder screen). Grab adds two additional capabilities.
- Timed Screen: Once you select Capture > Timed Screen a count down appears and then it takes the screenshot
- Custom Mouse Pointer: you can select how does your mouse pointer appears on the screen from a handful of 8 choices.
Windows
Unlike Macintosh, windows was not offering its users that much of options for taking screenshots until Windows 7 (it was included in Vista but users had to install it additional to default windows options). In windows 7, Microsoft added a tool named Snipping Tool that gives users the option to take screenshot from the entire screen, selected area, particular windows or free form. Basically it has one additional option, free form, which lets user to freely take screenshot with their desired shape from the screen (I don't get what is the reason for it, possibly Microsoft wanted to be cool!)

By default there is no hotkey assigned to Snipping tool and you can either add a shortcut of it to task bar so you can run it quickly, or simply press Windows key (or click start menu), start typing "Snip..." on your keyboard and as it shows up in the search results hit enter to run it.
For ease of use, you can assign your desired hot-key to run Snipping Tool. The method would differ between Windows 7 and Windows 8 and 10.
In windows 7:
- Search for Snipping Tool in start menu
- Once it shows up, right click and select "Properties"
- In Shortcut tab, highlight the Shortcut Key field and press you desired combination
In windows 8 and 10, follow these steps:
- Search for Snipping Tool in start menu
- Once it shows up, right click and select "Open file location"
- An explorer window opens containing "Snipping Tool" shortcut
- Right click on it and select Properties
- In Shortcut tab, highlight the Shortcut Key field and press you desired combination

A custom hot-key assigned to Snipping Tool
Ubuntu
Ubuntu like Mac offers a set of pre-defined hot-keys to take screen shots. But unfortunately, these all the combinations include "Print" (aka Print Screen) button which is not available on many smaller size keyboards such as laptops. Here are a list of them in Ubuntu 14:
- Full Screen : Print
- Window: Alt + Print
- Selected Area: Shift + Print
- Full Screen to Clipboard: Ctrl + Print
- Window to Clipboard: Ctrl + Alt + Print
- Selected Area to Clipboard: Shift + Ctrl + Print
In the first 3 options, a window will appear to ask you where to save the file. If you are willing to change these combinations you can go to System Settings > Keyboard > Shortcuts and select Screenshot from the left menu
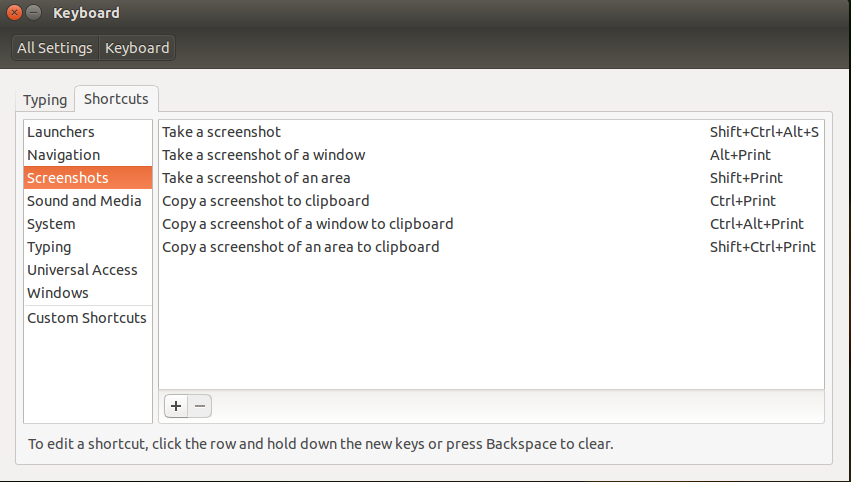
Keyboard shortcut settings window for Screenshots with a custom hot-key assigned to the first item.
In addition, similar to Mac and Windows, Ubuntu offers an application named "Shortcut" with a graphical user interface that you can use it. To use Shortcut simply search for it in the Ubuntu menu.

Please share your opinion in the comments below and share this post with your friends to let them know about these capabilities in their operating systems.