

Developing custom controls in Swift is usually required based on the application you are working on. Recently, I've been developing an app that I was required to show data analysis output on a Self-Organizing Map (SOM) chart. Today, I've decided to write this tutorial and share my experience with you.
In this tutorial you will learn about:
Basic concept of creating custom controls
Use UIBezier curves to draw shapes
Using CGGraphics commands to replicate and shapes
Enable Interface Builder interaction for your control
If you're wondering about self-organizing map, it is a type of Artificial Neural Networks (ANN) that is trained using competitive learning to map multi dimension data into lower and visualizable dimensions. Read more on Wikipedia
Before we jump into coding, let's have a clear view of what we are going to make. An SOM chart is typically consist of a beehive shaped set of hexagons where each one of them are represented by a color. In various settings, the color might represent different meanings but the most common use of SOM charts is to show distance between units (neurons) on the 2D space. So the warmer color would mean larger distance and cooler color means less distance.
As I mentioned in the title, we are going to make the component interactive in Interface Builder so the final product would look like this:
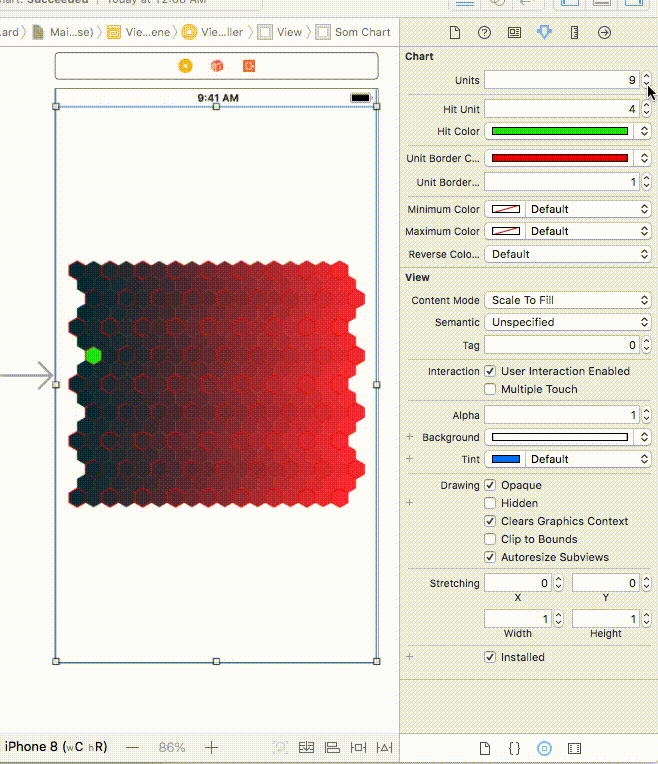
Our first step is to create a new Swift file and create a class for the SOM Chart. As you can see, we put @IBDesignable on the component so we’re telling XCode that this component should be editable in InterafaceBuilder
import UIKit
@IBDesignable
class SOMChart : UIView {
}
Now, let’s complete the class by adding out main parameters.
Most of the parameters bellow are straight forward but I need to talk about distance matrix. The distance matrix is an array in which we show the distance of each node from the baseline (aka we define the value for the unit). Basically we can pass the output of our SOM algorithm (from Matlab, Python or anywhere else that we have it) to this array and have it visualized. If we do not set the distance matrix, the component shows a gradient of red to black color.
let π:CGFloat = CGFloat(Double.pi)

@IBInspectable var units : Int = 4
@IBInspectable var hitUnit : Int = 0 {
    didSet {
        if hitUnit > units * units {
            hitUnit = units * units
        }
        if (hitUnit < 0) {
            hitUnit = 0
        }
        setNeedsDisplay()

    }
}

@IBInspectable var hitColor : UIColor = UIColor.green
@IBInspectable var unitBorderColor : UIColor = UIColor.white
@IBInspectable var unitBorderWidth : CGFloat = 1.0

@IBInspectable var minimumColor : UIColor = UIColor.blue
@IBInspectable var maximumColor : UIColor = UIColor.red
@IBInspectable var reverseColorMap : Bool = true

var distanceMatrix : [Double]? {
    didSet {
        if (distanceMatrix != nil) {
            let n = Double((distanceMatrix?.count)!)
            let n2 = (sqrt(n) + 1) / 2
            units = Int(n2)
        }
    }
}
We need one helper function as well which help us generated an intermediate color (between min and max colors) based on the cell value.
func hexColorFromDistance (_ hexNo: Int) -> UIColor {

    var hexColor = UIColor()
    let rate = distanceMatrix![hexNo - 1] / (distanceMatrix?.max())!
    var startHue = CGFloat()
    var startSat = CGFloat()
    var startBri = CGFloat()
    var startAlpha = CGFloat()
    var endHue = CGFloat()
    var endSat = CGFloat()
    var endBri = CGFloat()
    var endAlpha = CGFloat()

    minimumColor.getHue(&startHue, saturation: &startSat, brightness: &startBri, alpha: &startAlpha)
    maximumColor.getHue(&endHue, saturation: &endSat, brightness: &endBri, alpha: &endAlpha)

    if endHue == 1.0 && reverseColorMap == true {
        endHue = 0.0
    }

    let h = startHue + ((endHue - startHue) * CGFloat(rate))
    let s = startSat + ((endSat - startSat) * CGFloat(rate))
    let b = startBri + ((endBri - startBri) * CGFloat(rate))

    hexColor = UIColor(hue: h, saturation: s, brightness: b, alpha: 1.0)

    return hexColor

}
The next step is to actually draw the hexagons on the page:
override func draw(_ rect: CGRect) {
    let context = UIGraphicsGetCurrentContext()
    let hexPerRow = units + (units - 1)
    let nHex = pow(Double(hexPerRow), 2)
    let spaceAvailable = min(rect.width, rect.height)
    let hexHeight = spaceAvailable / CGFloat(hexPerRow)
    let hexWidth = sin(π/3) * hexHeight

    //1 - save original state
    context!.saveGState()

  //2 - Create our hexagon
    let hexPath = UIBezierPath()

    hexPath.move(to: CGPoint(x:hexWidth/2,y:0))
    hexPath.addLine(to: CGPoint(x: hexWidth, y: hexHeight / 4))
    hexPath.addLine(to: CGPoint(x: hexWidth, y: 3 * hexHeight / 4))
    hexPath.addLine(to: CGPoint(x: hexWidth / 2, y: hexHeight))
    hexPath.addLine(to: CGPoint(x: 0, y: 3 * hexHeight / 4))
    hexPath.addLine(to: CGPoint(x: 0, y: hexHeight / 4))
    hexPath.close()

    var hexNo = 0.0
    var unitNo = 0
    let colorStep = 1.0 / nHex
    let xTrans = [hexWidth / 2, 0, hexWidth / 2, hexWidth]
    let x_inset = (rect.width - hexWidth * CGFloat(hexPerRow + 1)) / 2
    let y_inset = (rect.height - (hexHeight * CGFloat(hexPerRow - 1) * 3 / 4 ) - hexHeight ) / 2

    for ii in 1...hexPerRow {
        for jj in 1...hexPerRow {
            context!.saveGState()
            // Determine if current hex is a unit and if it has been hit
            hexNo += 1.0
            var isUnit = false
            var isHit = false
            if (ii % 2) == 1 && (jj % 2) == 1 {
                unitNo += 1
                isUnit = true
                if unitNo == hitUnit {
                    isHit = true
                }
            }

            // Transform Context to place Hex in correct place

            let transX = x_inset + (CGFloat(ii-1) * hexWidth) + xTrans[jj % 4]
            let transY = y_inset + CGFloat(jj-1) * hexHeight * 3 / 4


            context!.translateBy(x: transX,
                                  y: transY)

            // Set Fill Color
            var faceColor = UIColor()

            if distanceMatrix == nil {
                faceColor = UIColor(red: CGFloat(hexNo * colorStep), green: 0.2, blue: 0.2, alpha: 1.0)
            } else {
                faceColor = hexColorFromDistance(Int(hexNo))
            }

            if (isHit) {
                faceColor = hitColor
            }

            faceColor.setFill()
            hexPath.fill()

            // set border if required
            if isUnit {
                let borderColor = unitBorderColor
                borderColor.setStroke()
                hexPath.lineWidth = unitBorderWidth
                hexPath.stroke()
            }
            context!.restoreGState()
        }
    }

    //8 - restore the original state in case of more painting
    context!.restoreGState()
}
Now, our component is ready to be used on the interface builder. We can also feed it with data on runtime. Here is an example:
class ViewController: UIViewController {

    @IBOutlet weak var somChart: SOMChart!
    var dataValues : [Double]?
     override func viewDidLoad() {
        super.viewDidLoad()
        // Load a sammple JSON file
        if let path = Bundle.main.path(forResource: "sample_som", ofType: "json")
        {
            if let jsonData = NSData(contentsOfFile: path)
            {
                do {
                    let json = try JSONSerialization.jsonObject(with: jsonData as Data, options: JSONSerialization.ReadingOptions()) as! NSDictionary
                    dataValues = json["data"] as? [Double]
                    somChart.distanceMatrix = dataValues
                } catch {
                    print(error)
                }
            }
        }
    }
}
Hope was useful for you. You can see the complete SOM Chart code with and example Xcode project (tested on Swift 4.0) on my Github.
Happy Coding!